Cardboard House Decorating Ideas: Transform Simple Boxes Into Stunning Miniature Homes
Ever wondered how to turn ordinary cardboard into extraordinary miniature homes? What if the humble shipping box could become the foundation for a cozy fairy cottage, a sleek modern loft, or a detailed replica of your dream house? Cardboard house decorating ideas unlock a world of affordable, sustainable, and deeply creative crafting that captivates both children and adults. This isn't just about gluing a box shut; it's about embracing a versatile medium to build intricate worlds, one layer of corrugated wonder at a time. Whether you're crafting a playful playhouse for kids, a detailed architectural model, or a charming seasonal decoration, cardboard offers a blank canvas limited only by your imagination. Dive in with us to discover professional techniques, inspiring themes, and foolproof methods to elevate your cardboard creations from simple boxes to breathtaking works of art.
The surge in popularity of cardboard crafts isn't just a trend—it's a response to a growing desire for hands-on creativity and eco-conscious living. With global cardboard packaging waste reaching millions of tons annually, upcycling these ubiquitous materials into beautiful decor is both a practical and planet-positive choice. This guide will walk you through every stage, from selecting the right cardboard to applying finishing touches that make your miniature house look like it was bought from a high-end boutique. We’ll cover structural integrity, thematic design, painting secrets, lighting magic, and much more, ensuring you have the knowledge to tackle any project with confidence. Get ready to see that empty box not as trash, but as the blueprint for your next masterpiece.
Why Cardboard? The Unsung Hero of DIY Decor and Miniature Crafting
Before we grab the glue and paint, it’s essential to understand why cardboard is the ultimate medium for miniature house projects. Its benefits extend far beyond mere availability and cost. Corrugated cardboard—with its fluted inner layer—provides surprising structural strength when layered and assembled correctly. This makes it ideal for building walls, roofs, and even furniture that can withstand handling. Furthermore, its fibrous texture accepts adhesives, paints, and various finishes beautifully, allowing for endless surface customization. From a sustainability perspective, choosing cardboard diverts waste from landfills and reduces the need for new raw materials. A single recycled cardboard box can save significant energy and water compared to producing new craft materials.
The accessibility of cardboard democratizes creativity. You don’t need a expensive workshop or specialized tools to start. A few boxes, a craft knife, some glue, and paint are enough to begin. This low barrier to entry makes it perfect for family activities, classroom projects, or solo therapeutic crafting. The material’s forgiving nature is also a major plus; mistakes can often be covered, reshaped, or incorporated into the design. Unlike wood or plastic, cardboard is lightweight, making it safe for children’s playhouses and easy to move for display. Its neutral brown hue serves as a perfect primer for any color scheme or aesthetic, from rustic to ultra-modern. Embracing cardboard means embracing a flexible, eco-friendly, and deeply satisfying creative process.
The Different Types of Cardboard and Their Best Uses
Not all cardboard is created equal, and understanding the differences can drastically improve your final project.
- Single-Wall Corrugated: The most common type, with one layer of fluting between two liners. It’s versatile for walls, basic roofs, and larger structural elements. It’s easy to cut and shape but may need reinforcement for heavy details.
- Double-Wall or Triple-Wall Corrugated: Thicker and much stronger, with multiple fluted layers. This is your go-to for building sturdy foundations, load-bearing walls, or any part of the house that needs to support weight or endure frequent play.
- Pulp Board/Chipboard: The stiff, grayish cardboard often used for book covers or heavier packaging. It’s excellent for creating flat, rigid surfaces like floors, tabletops, or the backing for detailed cut-outs. It doesn’t have the fluted texture, offering a smoother finish.
- Paperboard: Thinner and more flexible, often used for cereal boxes or smaller cartons. Best reserved for delicate details like window shutters, miniature frames, or decorative appliqués. It’s not suitable for primary structure.
Getting Started: Essential Tools and Structural Preparation
A successful cardboard house begins long before the first stroke of paint. Proper preparation and the right tools ensure your structure is stable, safe, and ready for decoration. Rushing the prep work is the number one cause of wobbly walls and peeling finishes. Start by gathering your toolkit. You’ll need a sharp craft knife or X-Acto knife with plenty of replacement blades—dull blades crush cardboard instead of cutting it cleanly. A large self-healing cutting mat protects your surfaces and ensures precise cuts. A metal ruler is crucial for scoring and cutting straight lines; never use a plastic ruler as the knife will cut into it. For assembly, a high-quality PVA glue like Elmer’s or a hot glue gun (with adult supervision) are the standards. Hot glue sets fast but can be messy; PVA dries clear and is strong but requires clamping or holding.
The most critical phase is structural reinforcement. Cardboard’s arch-enemy is humidity and time, which can cause it to warp and soften. To combat this, create a “cardboard plywood” by layering sheets. Apply glue between two or three layers of cardboard, aligning the flutes in different directions for maximum strength, and weight them down until dry. Use this reinforced board for floors, roofs, and any large flat surfaces. For wall joints, don’t just glue edges. Create internal corner braces by cutting small triangles or strips of cardboard and gluing them inside the corners. Score along one side of a strip to make it bendable for a perfect corner fit. For roofs, a simple but effective technique is to create a triangular prism (a long, triangular tube) from reinforced cardboard for a classic pitched roof, which is far stronger than a flat piece. Always measure twice and cut once. Sketch your house design on graph paper first, transferring measurements directly to the cardboard. This planning phase prevents costly mistakes and wasted materials.
Choosing a Theme or Style: From Fairy Tale to Modern Minimalist
This is where your project truly comes to life. The theme you choose will guide every subsequent decision, from color palette to architectural details. A cohesive theme transforms a simple box into a believable, immersive miniature world. Consider the end purpose: Is this a child’s imaginative playhouse, a sophisticated decorative piece for a shelf, or a themed prop for a photoshoot? For a whimsical fairy tale cottage, think irregular, wobbly walls, a thatched roof (using crumpled brown paper or twine), and a small, round door. Add miniature garden elements like pebble paths and tiny plastic flowers. A modern architectural loft calls for clean lines, large geometric window cut-outs, a flat roof, and a monochromatic or bold primary color scheme. Use strips of cardboard to create the illusion of sleek metal siding or concrete panels.
For a cozy cabin or chalet, use brown paint with darker wood-grain details (created with a fine brush and diluted paint). Add “logs” by rolling strips of cardboard, and a snow-capped roof with white paint and a touch of coarse salt or glitter mixed into the paint for texture. A Victorian or Gingerbread house is a classic, allowing for elaborate decorative trim. Cut intricate patterns for “gingerbread” details using a printed template traced onto cardboard. Paint in pastels and add “candy” details with small beads or painted dots. Don’t forget themed interiors! A pirate ship house needs porthole windows and a treasure chest interior; a spaceship house requires metallic paint and control panel details made from bottle caps and wires. Creating a mood board on Pinterest or a physical board with clippings can solidify your vision and keep your decorating choices consistent.
Blending Styles for a Unique Look
Don’t feel confined to one pure style. The most interesting creations often blend elements. Imagine a rustic farmhouse with modern industrial lights (made from beads and wire), or a Medieval castle with a surprise pop-art colored interior. The key is to have one dominant style and use other elements as accent features. This approach adds personality and tells a more complex story through your decor.
Painting and Finishing Techniques: The Foundation of Professional Look
Paint is the great equalizer, hiding cardboard’s brown seams and transforming texture into illusion. The cardinal rule: never paint directly onto raw cardboard without a sealant or primer. The porous surface will absorb paint unevenly, leading to a blotchy, streaky finish that highlights every imperfection. Start by applying a sealant or primer. A simple, inexpensive option is a mixture of white glue and water (about a 1:1 ratio) painted on with a wide brush. This seals the surface and creates a smooth, light-colored base. For a more durable option, use an acrylic gesso or a spray primer in a well-ventilated area. Let it dry completely.
When it comes to paint, acrylic paint is your best friend. It’s water-based, easy to clean, dries quickly, and adheres well to sealed cardboard. For large areas, use wide, flat brushes to avoid brush strokes. For details, invest in a set of fine-tipped brushes. A pro technique is to thin your acrylic paint slightly with water for the first coat; this soaks into the sealant and creates a smooth base without obscuring details. Apply a second, slightly thicker coat for opacity. To create realistic textures like wood grain, paint a base brown, let it dry, then drag a darker shade (brown mixed with a touch of black) lightly with a dry, stiff brush in the direction of the grain. For stone or brick, use a light gray base, then dab on slightly darker gray and brown spots with a crumpled paper towel or a stippling brush. Don’t strive for perfection—natural textures are irregular.
Sealing for Longevity
Once your paint is completely dry (wait 24 hours for best results), a final sealant is non-negotiable for any house that will be handled or displayed in a variable environment. A matte or satin acrylic varnish (applied with a soft brush or sponge) protects against dust, moisture, and fading. For a glossy, ceramic-like finish on specific elements (like a shiny roof tile or window), use a gloss varnish sparingly. Spray varnishes provide an ultra-smooth, even coat but must be used outdoors or with excellent ventilation. This final protective layer is what will keep your cardboard house looking vibrant for years to come.
Adding Texture and Dimension: Beyond the Flat Surface
Flat walls are for boxes, not character-filled miniature houses. Adding texture and three-dimensional details is what creates depth, realism, and tactile appeal. Cardboard itself is a textural goldmine; you can manipulate its flutes, layer it, or combine it with other household items. To simulate shingles, cut small rectangles from the corrugated edge of cardboard. The fluted edge naturally looks like a shingle’s ridge. Glue them in overlapping rows starting from the bottom of the roof. For a thatched roof, crumple brown paper bags or twine into a messy, dense thatch and glue it onto a cardboard roof base. Brick or stonework can be created by cutting small squares or rectangles from thicker pulp board and gluing them on with gaps for mortar, which you paint in afterward.
Don’t ignore the power of mixed media. Glue on actual sand for a beach base or pathway. Use modeling clay or polymer clay (like Sculpey) to sculpt unique chimneys, door knobs, or animal figurines that can be baked hard. Twigs and leaves from the garden make perfect miniature logs and foliage. Fabric scraps can become curtains, rugs, or upholstery. Beads are ideal for doorknobs, lights, or garden decorations. A clever trick for creating wooden plank siding is to cut thin strips of cardboard and glue them onto the wall with a small gap, then paint the gaps as shadow lines. For stucco or textured walls, mix a small amount of joint compound or texture paste with acrylic paint and apply it with a palette knife or crumpled cloth. The key is to think about the real-world material you’re imitating and find a cardboard or household item analog for it.
Lighting and Ambiance: Bringing Your Cardboard House to Life
Lighting is the single most transformative element you can add to a cardboard house. It shifts the piece from a static model to a dynamic, magical scene. The safest and easiest option for most projects is battery-powered LED fairy lights or tea lights. These produce minimal heat, eliminating any fire risk for your flammable cardboard structure. Warm white LEDs create a cozy, inviting glow, while colored LEDs can set a festive or fantastical mood. To install them, plan your wiring during the construction phase. Create small holes in walls or under roofs to thread the tiny wire through. Use a dab of hot glue to secure the light bulb or the wire inside the house so it doesn’t pull out. You can arrange them as string lights along the roof edge, inside windows, or as a single “lamp post” made from a painted toothpick with a glued-on LED.
For a more advanced touch, consider creating light fixtures. A simple pendant light can be made by painting a small bead or the cap of a pen, threading the wire through a tiny hole, and gluing it to the ceiling. A street lamp can be constructed from a toothpick (pole) and a flattened piece of cardboard or a painted bead (lampshade), with the LED poking through. For interior scenes, a single tea light placed inside a painted cardboard lantern or under a miniature table can cast beautiful, warm shadows on the walls. Fiber optic strands offer a magical, starry effect but are more complex to set up. Always ensure your light source is secure and that batteries are easily accessible for replacement. The glow from within makes your cardboard house feel alive, inhabited, and truly special.
Seasonal and Holiday Decor: A Year-Round Source of Joy
One of the greatest joys of a cardboard house is its adaptability. With a few thematic swaps, your creation can celebrate every season and holiday, providing ongoing engagement and fresh decor. For Christmas, transform it into a gingerbread house or a cozy chalet. Add cotton ball “snow” on roofs and windowsills, miniature candy cane decorations (use red and white striped paper or actual mini candy canes), and a tiny tree made from a clump of rosemary or a painted cardboard cone. String red or green fairy lights around the perimeter. For Halloween, paint it in muted, spooky colors (grays, purples, oranges). Create a haunted atmosphere with orange or purple LED lights inside. Add paper bats, a tiny graveyard made from popsicle sticks, and a “spooky tree” from a twisted twig. Easter calls for pastel colors, a cardboard basket, and tiny painted eggs. Summer might mean a beach theme with sand, a paper umbrella, and blue “water” painted on a base.
The key to easy seasonal transitions is to design with modularity in mind. Use removable decorations. Paint your base house in neutral colors (whites, beiges, light grays) so seasonal accents pop. Create a “holiday box” where you store all your themed miniatures and decorations. You can even design the house with a simple, removable roof or front facade that can be swapped out. For example, a plain roof can have a felt pumpkin glued on for fall, a paper snowflake for winter, and a paper sunflower for summer. This approach means you don’t have to rebuild the entire structure each year; you simply redecorate, keeping the core of your project fresh and engaging throughout the seasons.
Functional Decor Pieces: Furniture and Miniature Accessories
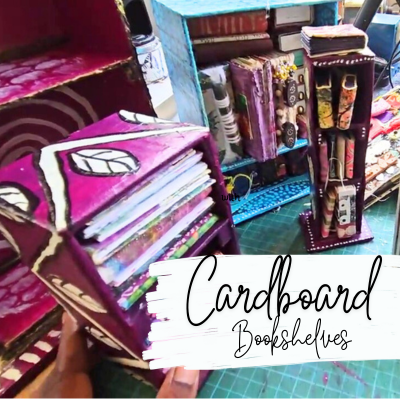
A house is more than a shell; it’s the life inside that tells the story. Creating functional miniature furniture and accessories elevates your decor from a model to a scene. Start simple. Beds can be made from small cardboard boxes or folded pieces, with a fabric scrap as a blanket and a cotton ball as a pillow. Tables and chairs are easily crafted from strips of cardboard, using simple interlocking tabs instead of glue for strength. A toilet for a bathroom? A small cylindrical container (like a lip balm tube) glued to a cardboard base, with a painted seat. Bookshelves are just small rectangles with glued-on cardboard “books” made from painted paper scraps. The scale is crucial—keep everything proportional to your house size. A good rule of thumb is to use a 1:12 scale (1 inch in the dollhouse equals 12 inches in real life), but for playful kids' crafts, approximate sizing is fine.
Incorporate real-world miniature items available at craft stores: tiny plastic food, dollhouse furniture, or miniature picture frames. These can be fantastic time-savers. However, handmade items add unparalleled charm. Create a rug from a piece of felt or woven yarn. Curtains can be from lace or thin cotton, glued to a small rod made from a toothpick. Lamps we discussed in the lighting section. Kitchen counters can be a simple cardboard shelf with “appliances” made from bottle caps (stove) and small boxes (microwave). Don’t forget exterior details: a miniature mailbox from a bottle cap, a birdbath from a bottle cap glued to a stone, or a garden fence from popsicle sticks. Building these pieces, even simple ones, creates a sense of narrative and makes the space feel lived-in and complete.
Sustainability and Eco-Friendly Practices: Crafting with a Conscience
At its heart, cardboard house decorating is a profound act of upcycling—transforming waste into something of value and beauty. To maximize the environmental benefit, extend your sustainable practices beyond just the main material. Source your cardboard responsibly. Use boxes that would otherwise be thrown away from your own deliveries, ask local businesses for their used boxes, or check community “freecycle” groups. Avoid using new, virgin cardboard whenever possible. When it comes to adhesives, opt for water-based PVA glues which are less toxic and have a lower environmental impact than many super glues or epoxy resins. For paints, acrylics are a better choice than oil-based paints due to lower VOC emissions, but even better are natural, plant-based paints or milk paint if you want to go fully eco.
Think about the entire lifecycle of your creation. Use recycled materials for fillers and textures: old magazines for papier-mâché, scrap fabric for rugs, and twine from gardening supplies. When your cardboard house eventually reaches the end of its decorative life (which, with proper sealing, can be decades), it can be fully recycled again. Avoid mixing in non-recyclable materials like plastic trims or Styrofoam if you want it to be fully compostable or recyclable at the end. You can even design your house to be disassemblable, using slots and tabs instead of permanent glue, so the flat cardboard pieces can be easily recycled separately. By making these conscious choices, your craft project becomes a statement on creativity, resourcefulness, and care for the planet. You’re not just building a house; you’re modeling a circular economy in miniature.
Troubleshooting Common Issues: Solutions for Warping, Peeling, and More
Even the most careful crafter encounters setbacks. Knowing how to solve common problems saves projects from disaster. Warping is the most frequent issue, caused by moisture from paint, glue, or humidity. Prevention is key: always seal cardboard first, use minimal glue, and work in a dry environment. If warping occurs, weight it down immediately with heavy books while it dries. For already warped pieces, you can sometimes gently bend them back and re-seal the opposite side. Peeling paint or finish usually means the surface wasn’t sealed properly or the paint was applied too thickly. Sand the peeling area lightly with fine-grit sandpaper, re-prime, and apply thin, even coats of paint. Weak joints that keep breaking need more than just a surface layer of glue. Reinforce from the inside with small cardboard corner blocks or strips. For a super-strong bond, use a two-part epoxy on critical internal joints, but be aware it’s not as easy to correct mistakes.
Fingerprints and smudges on painted surfaces can be fixed by lightly sanding the area and touching up with paint. Glue stains on visible surfaces are trickier; if the glue is white PVA, you can sometimes scrape off the excess once dry and then paint over. Hot glue strings are best removed while still warm with a toothpick. If your detailed cut-outs are tearing, you likely used a dull blade or cut against the grain. Always use a fresh blade and test cuts on scrap cardboard first. For intricate interior details that are hard to reach with a brush, use a fine-tipped paintbrush or even a toothpick dipped in paint. Finally, if your house feels unstable, reassess your structural design. Are the walls adequately braced? Is the roof too heavy for the walls? Adding internal cross-braces or a central support column can solve most stability issues. Remember, every problem is a learning opportunity that makes your next build even better.
Conclusion: Your Cardboard Journey Begins with a Single Box
Cardboard house decorating ideas are so much more than a crafting pastime; they are a gateway to boundless creativity, sustainable living, and the profound satisfaction of building something tangible with your own hands. From the initial selection of the perfect, rescued box to the final brushstroke of varnish, each step is a lesson in design, engineering, and artistry. You’ve learned how to choose the right cardboard for strength, how to reinforce structures for longevity, and how to select a theme that tells a story. You’ve mastered painting techniques that hide seams and create texture, discovered how to add magic with simple LED lights, and explored ways to make your creation a year-round decorative staple. Most importantly, you’ve embraced a medium that is accessible to all, kind to the planet, and endlessly adaptable.
So, what will you build? A towering castle for a child’s imagination? A serene, modern tiny home for your desk? A festive seasonal centerpiece that brings joy year after year? The only limit is your creativity. Start small with a simple gingerbread house to practice techniques, then dream bigger. Gather your boxes, your tools, and your inspiration. That ordinary piece of cardboard waiting for the recycling bin is not waste—it’s potential. It’s the walls of a future memory, the roof of a handmade dream. Pick up your craft knife, seal that first surface, and begin. Your stunning, unique, and sustainable cardboard masterpiece is waiting to be built, one idea at a time.