Cardboard Gingerbread House Design Ideas: Creative & Eco-Friendly Holiday Crafts
Have you ever wondered if you could capture the magic of a gingerbread house without the mess, the crumbling, or the hefty price tag of real gingerbread? What if you could build a stunning, durable, and completely customizable holiday centerpiece using something as simple and accessible as a cardboard box? Welcome to the world of cardboard gingerbread house design ideas, where traditional charm meets modern crafting ingenuity. This isn't just a hack; it's a creative revolution for holiday decor that families, artists, and decorators are embracing for its versatility, sustainability, and sheer fun factor. Forget the stress of baking and icing structural failures—with cardboard, your only limit is your imagination.
In this comprehensive guide, we’ll unpack everything you need to know to design, build, and decorate breathtaking cardboard gingerbread houses. From sleek modern interpretations to whimsical fairy-tale fortresses, we’ll explore styles, techniques, and pro tips that will have you looking at that shipping box in a whole new light. Whether you're a crafting novice or a seasoned DIY enthusiast, prepare to discover how this humble material can become the star of your holiday season.
Why Cardboard? The Unbeatable Benefits for Your Gingerbread Project
Before we dive into specific designs, let’s address the obvious question: why choose cardboard over traditional gingerbread or other materials? The advantages are compelling and make it a superior choice for most crafting scenarios.
First and foremost is durability and longevity. A cardboard gingerbread house won’t sag under humidity, won’t attract ants, and won’t crumble when a curious toddler bumps into it. It can be stored and brought out year after year, becoming a cherished heirloom. Second is cost-effectiveness. A few large cardboard boxes are essentially free, making this project incredibly budget-friendly compared to purchasing pre-made kits or expensive baking supplies. This opens up the craft to everyone, regardless of budget.
Third, and perhaps most importantly for creative freedom, is versatility. Cardboard can be cut, scored, folded, layered, and painted with ease. You can create architectural details—like intricate window frames, shingles, or turrets—that would be nearly impossible with stiff, brittle gingerbread. It provides a perfect, neutral canvas for any color scheme or theme. Finally, there’s a significant eco-friendly appeal. Repurposing cardboard boxes that would otherwise be recycled or landfilled aligns perfectly with growing sustainable holiday practices. It’s a simple way to reduce waste while creating beautiful decor.
Exploring Cardboard Gingerbread House Design Styles
The beauty of using cardboard is that it transcends the classic, edible gingerbread aesthetic. You can mimic any architectural style or fantasy world. Here are some popular cardboard gingerbread house design ideas to spark your creativity.
Modern Minimalist & Scandinavian Styles
Move over, cluttered candy facades. Modern design embraces clean lines, geometric shapes, and a monochromatic or muted color palette. Think white or light gray cardboard houses with sleek, rectangular forms, large "windows" cut out and backed with tissue paper or vellum to mimic frosted glass, and minimal "trim" made from painted strips or thin wood veneer. A Scandinavian-inspired house might feature a simple A-frame, a tiny cardboard "sleigh" on the roof, and subtle pops of red or forest green. The focus is on shape and silhouette rather than busy decoration.
Rustic & Timber-Frame Aesthetics
Capture the cozy, hand-hewn look of a mountain cabin or European chalet. Paint your cardboard in warm browns and tans. Use brown paper bags or crinkled tissue paper glued in layers to create a textured, log-cabin effect. Add "timber" details by gluing on thin strips of painted cardboard or actual twigs. A rustic house often has an asymmetrical roof, a small porch with cardboard log railings, and perhaps a "stone" chimney made from painted pebbles or crumpled foil. It’s all about embracing imperfection and natural textures.
Whimsical & Fairytale Creations
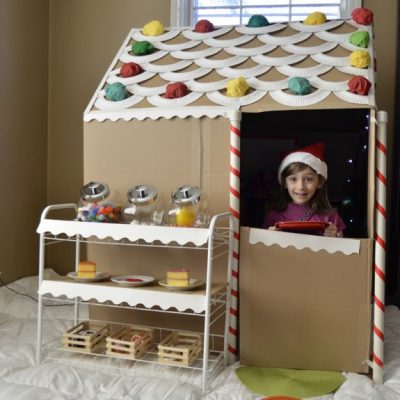
This is where you can let your inner child run wild. Think gingerbread houses from storybooks—crooked roofs, wobbly windows, and exaggerated, playful proportions. Create a house with a lollipop-stick fence, a candy cane path made from painted PVC pipe or rolled paper, and a roof that looks like it’s covered in giant, colorful "shingles" cut from painted cardboard circles. Don’t worry about realism; embrace charm and character. A fairy-tale cottage might have a circular door, a spiral staircase cut from cardboard inside, and a "candy garden" with painted cardboard flowers.
Victorian & Ornate Mansions
For those who love detail, a Victorian-style mansion is a perfect cardboard project. Use a base of corrugated cardboard for easy cutting and a textured look. Create elaborate "gingerbread" trim by cutting intricate patterns (like scrolls, lace, and brackets) from thin cardboard or even cardstock. Layer these trims around windows, along the roof peak, and under the eaves. A deep, rich color palette—burgundy, forest green, gold—painted with a brush works beautifully. Add "stained glass" windows by cutting a design and gluing colored tissue paper or clear plastic behind it.
Themed & Pop Culture Houses
Why limit yourself to Christmas? Cardboard houses are perfect for Halloween haunted mansions, with spooky windows, a "creaky" door, and bat silhouettes. Create a Star Wars-themed house on Tatooine with a sandy color palette and a tiny landspeeder. Or build a Harry Potter-style cottage with a thatched roof (use raffia or crinkled paper) and a "Forbidden Forest" backdrop. Themed houses are fantastic for kids' rooms or unique party decor.
Step-by-Step: Building Your Cardboard Gingerbread House Foundation
Now, let’s get hands-on. Building a sturdy base is crucial for any successful design.
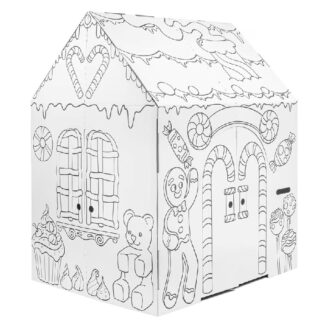
1. Planning & Templates: Start by sketching your house design on paper. Decide on the basic shape—a simple rectangle with a triangular roof is the classic starting point. Draw full-scale templates for each piece: two identical walls, a front and back wall (which can be different if you want a fancy facade), and two roof panels. For a more complex design, you’ll need templates for towers, porches, etc. There are countless free printable templates online for classic gingerbread houses that you can adapt for cardboard.
2. Cutting & Scoring: This is the most important technical step. Use a sharp utility knife or craft knife and a self-healing cutting mat. For straight cuts, a metal ruler and a craft knife work best. For curves, cut slowly and steadily. Scoring (making a shallow cut along a fold line) is essential for clean, crisp folds. Use a blunt tool like a butter knife or the back of your scissors, pressing firmly along your fold line on the outside of the cardboard. This weakens the inner corrugation, allowing for a perfect fold without tearing.
3. Assembly: Use a strong, quick-drying glue like tacky glue or a low-temperature hot glue gun. Hot glue is fast but can melt thin cardboard if you're not careful; test on a scrap first. Apply glue sparingly to the edges to be joined. Hold pieces together firmly for 30-60 seconds. For extra strength, especially on roof seams, you can reinforce the inside with thin strips of cardboard. Let the structure dry completely before decorating.
4. Reinforcing & Texturing: For larger houses, create an internal "skeleton." Cut smaller cardboard pieces to form a cross-brace inside the walls to prevent bowing. To add texture, glue on layers of crumpled brown paper bag for a stone or log look, or wrap the exterior in twine or yarn for a knitted, cozy effect. This step can be done before or after painting, depending on the desired look.
Decorating Techniques: Bringing Your Cardboard House to Life
This is where personality shines. The decorating phase for cardboard is more akin to painting a miniatures model than icing a cookie.
Painting:Acrylic paints are ideal—they adhere well to cardboard, dry quickly, and come in every color. Use a small brush for details and a larger one for base coats. For a distressed or vintage look, paint a base color, let it dry, then dry-brush a lighter or darker shade over the top, wiping off the excess to highlight texture. For a smooth, modern finish, sand the cardboard lightly with fine-grit sandpaper before painting to remove the corrugated texture, then apply multiple thin coats of paint.
Creating "Candy" & Details: Since you can't use real candy (it attracts pests and melts), you need creative substitutes.
- Windows & Stained Glass: Cut out window shapes. Back them with colored cellophane, tissue paper, or translucent plastic from old folders. For a "frosted" look, dab white acrylic paint lightly over the outside.
- Roofing: Use brown paper "shingles" (cut 2x4 inch rectangles, notch one end, and overlap them). For a snow-covered roof, paint the roof white and then dab on spots of white glue and sprinkle with fine iridescent glitter or Epsom salt.
- Candy Cane Poles & Gumdrop Lights: Roll thin strips of red and white cardboard or paper into spirals for candy canes. For lights, use tiny dots of glow-in-the-dark paint or attach miniature LED fairy lights (use battery packs hidden inside).
- Textured Trim: Use piping beads or cord from a craft store, glued on to mimic icing. Create "peppermints" by painting red and white swirls on small cardboard circles. Buttons, beads, and sequins make perfect "candy."
Adhesives for Decor: Beyond glue, consider double-sided tape for cleanly attaching lightweight elements. Mod Podge or a similar decoupage medium is perfect for sealing paint and attaching paper elements, giving a slight glossy finish. For 3D elements like tiny cardboard trees, use small dots of hot glue.
Thematic Design Ideas for Every Holiday & Season
Let’s explore some complete cardboard gingerbread house design ideas with specific themes.
1. The Enchanted Winter Forest Village: Create not just one house, but a whole scene. Build 3-4 houses of varying sizes and styles (a tiny cottage, a tall townhouse, a barn). Paint them in whites, grays, and soft blues. Make cardboard trees by rolling a piece of corrugated cardboard into a cone and slitting the sides to fan out, or by cutting a spiral from a square. Add a "frozen" pond using a piece of blue plastic wrap or painted cardboard sprinkled with glitter. This creates a magical, cohesive display.
2. A海滨度假风格 (Beach House Escape): Swap snow for sand! Paint the house in sandy beiges and whites with aqua blue accents. Use thin strips of cardboard painted to look like wooden shiplap siding. Create a "driftwood" porch with sticks. Make tiny surfboards from painted cardboard and lean them against the house. Add a palm tree from a green paper cone and a "beach ball" from a painted sphere. This is a refreshing, non-traditional take perfect for a winter birthday or summer decor.
3. The Steampunk Gingerbread Golem: For the truly adventurous, go steampunk. Paint your house in bronzes, coppers, and rusted oranges. Instead of candy, adorn it with gears cut from cardboard (use a compass to draw circles, then cut out teeth), copper pipe (use gold or bronze cording), and pressure gauges made from painted circles with needle pointers. Give it a weathered, industrial look with dry-brushing and washes of brown paint.
Making it a Family Affair: Kid-Friendly Cardboard Crafting
A cardboard gingerbread house is the ultimate inclusive holiday project. Here’s how to adapt it for different ages.
- Toddlers & Preschoolers: Their job is decorating pre-assembled houses. Provide them with large, chunky "candy" pieces: pre-cut circles and squares from colored paper, stickers, large washable dot markers for painting, and glue sticks. They can glue on paper "candies" and draw on windows. The focus is on sensory play and color.
- Elementary School Kids: They can help with cutting (with supervision) and painting. Provide safety scissors for cutting out pre-drawn window shapes. Let them choose the color scheme and paint the base. They can also create many of the decorative elements like paper snowflakes or rolled "candy canes."
- Tweens & Teens: They can handle the full build. Give them the tools and templates and let them take charge. This age group often enjoys more sophisticated themes—modern art, horror-themed haunted houses, or replicas of famous buildings. It’s a great project for developing spatial reasoning and patience.
Pro-Tip: To avoid frustration, build the main structure together first, then let each family member decorate a different section or their own mini-house to add to the village.
Display, Storage, and Preservation: Enjoying Your Creation for Years
Once your masterpiece is complete, you’ll want to showcase it properly.
- Display Ideas: Create a "snowy" base from a white fleece or flannel blanket, or a piece of white felt. Use cardboard to build risers for a tiered village effect. Incorporate natural elements like pinecones, small evergreen branches, and twigs. For a magical glow, hide battery-operated fairy lights inside the house (make a small access panel in the back) or underneath the "snow" base.
- Protection: Cardboard is vulnerable to moisture. Seal your finished house with a clear acrylic spray sealer (matte or satin finish) in a well-ventilated area. This protects the paint and paper decorations from dust and minor humidity. Avoid placing it directly under a real Christmas tree (needles and water) or near heat vents.
- Storage: After the holidays, gently brush off any loose glitter or dust. Store in a large, sturdy plastic bin with a lid. Crumple tissue paper and stuff it inside the house to help it maintain its shape and prevent crushing. Store the bin in a cool, dry place. With proper care, your cardboard gingerbread house can be a beloved tradition for decades.
Conclusion: Your Cardboard Canvas Awaits
The world of cardboard gingerbread house design ideas is a testament to the power of creative thinking and sustainable crafting. It transforms a simple, often-discarded material into a vessel for holiday magic, artistic expression, and family bonding. By choosing cardboard, you gain unparalleled design freedom, save money, and make an eco-conscious choice. From minimalist marvels to fantastical fortresses, the styles are as boundless as your imagination.
So this holiday season, raid your recycling bin, gather some basic tools and paints, and embark on a project that promises less stress and more lasting joy. Build a house that won’t crumble, that you can customize to match any decor, and that you can proudly display for years to come. The most important ingredient isn’t flour and sugar—it’s your creativity. Now, go build your dream cardboard gingerbread house.