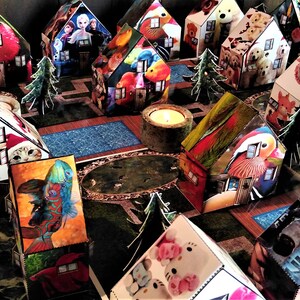
Easy Doll House Furniture Ideas: Transform Your Miniature World With Simple DIY Projects
Have you ever stared at an empty dollhouse and wondered how to fill it with charming, custom furniture without spending a fortune or needing a master's degree in woodworking? You're not alone. The quest for doll house furniture ideas easy enough for beginners yet beautiful enough to impress is a common journey for hobbyists, parents, and creative minds everywhere. The good news is that creating a stunning miniature world doesn't require expensive kits or advanced tools. With a little imagination and some everyday materials, you can craft unique, personalized pieces that bring your dollhouse to life. This guide will walk you through a treasure trove of simple, actionable projects that anyone can tackle, turning your miniature dreams into tangible reality.
We’ll explore how to repurpose household items, master basic cardboard construction, apply quick finishing techniques, and design cohesive themed rooms—all on a budget. Whether you're furnishing a child's first dollhouse or a collector's detailed masterpiece, these easy dollhouse furniture ideas prioritize creativity over complexity. You’ll learn to see potential in bottle caps, fabric scraps, and recycled cardboard, transforming them into sofas, beds, and kitchens. By the end, you’ll have a toolkit of skills and inspiration to make every room a reflection of your personal style, proving that the most magical miniature spaces are often built with love and a few clever tricks.
Repurpose and Upcycle: Hidden Treasures for Miniature Furnishings
One of the most accessible and eco-friendly approaches to easy dollhouse furniture is looking no further than your own home. Upcycling everyday objects is a cornerstone of beginner-friendly miniature crafting, turning waste into wonder. Items like bottle caps, wine corks, matchboxes, and clothespins are perfect raw materials. A simple bottle cap, with a dab of fabric and glue, becomes a plush ottoman or stool. Wine corks can be sliced into round coffee tables or stacked to form a quirky bookshelf. The beauty of this method is its affordability and the instant gratification of creating something from nothing.
To get started, create a "treasure box" of potential materials. Gather items such as:
- Buttons: Perfect for drawer pulls, chair seats, or decorative plates.
- Beads: Use as lamp bases, cabinet knobs, or table legs.
- Twigs and Popsicle Sticks: Ideal for constructing bed frames, chair backs, or rustic shelving.
- Fabric Scraps and Felt: Essential for upholstery, cushions, and rugs.
- Recycled Plastic: Containers from yogurt or butter can be cut into basins, sinks, or waste bins.
The key is to think proportionally and functionally. A thimble can be a perfect miniature vase, and a scrap of leather can become a chic executive chair seat. This approach not only saves money but also teaches a valuable skill: seeing the potential in the ordinary. For example, a discarded DVD case can be dismantled; its clear plastic becomes protective display covers, and the cardboard interior is a goldmine for constructing shelves and cabinet frames. By repurposing, you’re not just making furniture—you’re adopting a sustainable crafting mindset that adds a unique story to every piece in your dollhouse.
Cardboard Crafts: The Ultimate Blank Canvas for DIY Dollhouse Furniture
If there’s one material that defines easy doll house furniture ideas, it’s undoubtedly cardboard. Readily available, incredibly versatile, and surprisingly sturdy when layered, cardboard is the ultimate blank canvas for miniature builders. You don’t need to be a carpenter; a sharp craft knife, a ruler, and some strong glue are your primary tools. Start by sketching your furniture design to scale on paper. A simple rectangle with four legs becomes a dining table; a larger box with a folded lid transforms into a wardrobe with doors.
Mastering basic cardboard construction techniques unlocks endless possibilities. The first skill is creating clean, straight cuts—always cut away from you on a self-healing mat for safety and precision. Next, learn to build simple boxes and rectangles, the foundational shapes for most furniture. Reinforce joints by scoring and folding flaps to create interlocking tabs, or use small L-brackets and wood glue for extra strength. For curved pieces like headboards or chair backs, gently score the backside of the cardboard in parallel lines; this allows it to bend smoothly without cracking.
Consider these cardboard furniture projects for different rooms:
- Living Room: Construct a modern sofa by cutting two identical rectangles for the base and back, then padding and covering them with fabric. Add rolled cardboard tubes for armrests.
- Kitchen: Build a countertop by layering several sheets of cardboard for thickness, then painting it with acrylics to mimic marble or wood. Create cabinet doors by cutting a frame from cardboard and inserting a thin piece of plastic or painted cardboard as the panel.
- Bedroom: A bed frame can be made from four cardboard strips. The mattress is a padded rectangle of cardboard covered in fabric. For a canopy bed, use four vertical posts and drape netting or lace.
To make your cardboard furniture look professional, finish it properly. Sand rough edges with a fine-grit sandpaper. Apply a thin coat of white acrylic paint as a primer to hide the cardboard’s brown color and create a smooth base. Then, use paint, wood-grain stickers, or even thin veneer sheets to achieve your desired finish. A final coat of matte or satin varnish seals the piece and adds durability. With cardboard, the only limit is your imagination, making it the perfect starting point for anyone exploring easy dollhouse furniture.
Simple Upholstery and Soft Furnishings: Adding Comfort and Character
What transforms a basic wooden or cardboard structure into a cozy, inviting piece of furniture? The answer lies in simple upholstery and soft furnishings. You don’t need a sewing machine; many techniques are hand-sewn or even no-sew. The goal is to add texture, color, and a sense of lived-in comfort to your miniature rooms. Start with the essentials: a pair of small scissors, a needle and thread, fabric scraps, and thin foam or batting (even cotton wool can work for small projects).
Creating a basic padded seat or cushion is a fundamental skill. Cut your foam to the exact size of your chair or sofa seat. Wrap it in batting to soften the edges, then cut your "fabric" (a durable material like felt, microfiber, or upholstery fabric scraps) with a 1-inch seam allowance all around. Place the foam and batting on the wrong side of the fabric, pull the fabric taut over the top, and hand-stitch the edges together on the bottom using a simple running stitch or a slip stitch for a hidden seam. For a more tailored look, add piping made from cord wrapped in fabric.
Beyond seats, soft furnishings bring a room to life. Consider these easy projects:
- Throw Pillows: Cut two identical fabric squares, sew three sides, stuff with batting, and sew the final side closed. Experiment with different fabrics for a layered, eclectic look.
- Rugs and Curtains: Use a piece of felt or woven fabric for a rug. For curtains, cut a rectangle of thin cotton or lace, hem the edges, and use a tiny dab of glue or a hand-stitched loop to attach it to a miniature rod (a toothpick or skewer works perfectly).
- Bedding: A simple quilt can be made by sewing together small squares of fabric. A duvet cover is just two rectangles sewn together on three sides, with a ribbon or fabric loop for closure.
Remember, scale and proportion are critical. Your fabrics should have a weave or print that looks appropriate at 1:12 or 1:6 scale. Avoid large, bold prints that can overwhelm a tiny space; small checks, dots, or solid colors often look more realistic. These soft elements add immense warmth and personality, proving that easy dollhouse furniture ideas extend far beyond hard structures.
Quick Painting and Finishing Techniques for a Professional Look
A raw piece of cardboard or wood can look charmingly rustic, but sometimes you want the polished look of oak, mahogany, or marble. Achieving this doesn’t require professional skills—just a few clever painting and finishing tricks. The secret is in the preparation and layering. Always start with a primer. A coat of white or gray acrylic paint seals the surface and provides a neutral base that makes your final colors pop and appear more even.
For wood grain effects, you don’t need special tools. After your base coat of brown paint is dry, use a fine brush to paint thin, wavy lines of a slightly darker brown or black. Immediately drag a dry brush lightly over the wet lines to soften and blur them, creating a realistic wood grain pattern. For a marble effect, paint your base color (white, gray, or beige). While still wet, dab on a second, contrasting color (like dark gray or blue) with a crumpled paper towel to create veining. Let it dry, then lightly sand some areas to wear it through for an antique feel.
Metallic finishes are surprisingly easy. Use acrylic paints in gold, silver, or copper. For a brushed metal look, paint your base color, let it dry completely, then very lightly drag a dry, stiff brush over the surface in one direction. For a chalk paint look (perfect for farmhouse or shabby chic styles), mix a little acrylic paint with plaster of Paris or baking soda to create a thick, textured paste. Apply it with a sponge brush for an authentic matte, slightly gritty finish.
Don’t forget the final seal. A matte or satin varnish (applied with a soft brush in thin coats) protects your paint job from dust and moisture, giving it a durable, professional finish. Test all your techniques on a scrap piece of cardboard first. With these simple methods, you can make a cardboard box look like a priceless antique armoire, elevating your easy dollhouse furniture from craft to art.
Themed Room Ideas: Cohesive Designs with Minimal Effort
Creating individual furniture pieces is fun, but the true magic happens when they come together in a cohesive, themed room. You don’t need to be an interior designer; by focusing on a simple color palette and a few key style elements, you can achieve a stunning, unified look with minimal extra effort. Themed rooms provide context and story, making your dollhouse feel like a real, lived-in home.
Let’s explore three popular, easy-to-achieve themes:
1. The Cozy Rustic Bedroom: This theme is all about warmth and texture. Use a neutral color palette of cream, beige, soft brown, and muted green. Furniture can be made from unpainted or lightly stained cardboard or balsa wood, with visible "grain" lines drawn on. The bed should have a bulky, quilted look with a simple patchwork or solid fabric cover. Add a rug made from a piece of felt or a braided scrap of yarn. Accessorize with miniature twig bundles (from a craft store) in a vase, a tiny book made from folded paper, and a "knit" blanket draped over the foot of the bed (use a small piece of textured fabric). The key is layered textures.
2. The Modern Minimalist Living Room: Embrace clean lines and a monochromatic scheme. Think white, gray, and black with one bold accent color (like mustard yellow or teal). Furniture should be sleek and geometric—low sofas, glass coffee tables (use clear plastic or acetate), and open shelving. Cardboard is perfect for this; paint it with matte acrylics. Add a single, large abstract painting on the wall (a small piece of painted canvas or even printed paper). A single sculptural plant in a geometric pot adds life without clutter. The principle here is less is more.
3. The Vintage Country Kitchen: Channel a nostalgic, farmhouse feel with warm reds, creams, and buttery yellows. Furniture should look slightly worn—distress painted surfaces by sanding edges after painting. A farmhouse table is easy: a rectangular cardboard top with turned legs made from rolled paper or small dowels. Create a vintage stove from a small cardboard box, painted black with silver knobs (beads). Curtains should be gingham or lace. Accessorize with tiny enamelware pots (made from bottle caps), a checkered tea towel, and jars filled with "preserves" (use colored beads or clay). The aim is charming imperfection.
To execute these themes without overwhelm, start with the largest piece (the bed, sofa, or table) and build your color and style around it. Use the same fabric or paint color for multiple small accessories to tie the room together. This focused approach makes easy dollhouse furniture ideas feel intentional and designer-worthy.
Smart Storage and Organization Solutions Within the Dollhouse
A beautifully furnished dollhouse can quickly look cluttered if you haven’t considered miniature storage solutions. But storage doesn’t have to be an eyesore; it can be an integral part of your decor. The goal is to create hidden compartments and stylish organizers that keep tiny accessories tidy while adding to the room’s authenticity. These solutions are among the most practical easy dollhouse furniture ideas, solving a common problem with elegance.
Hidden storage is your best friend. Think about furniture with dual purposes:
- Ottomans and Benches with Lids: Build a simple box with a hinged or removable lid. This is perfect for storing extra doll clothes, tiny books, or miniature tools. Line the inside with a scrap of fabric for a finished look.
- Beds with Drawers: Construct a bed frame with a shallow drawer underneath, using a thin piece of cardboard as the drawer bottom. This is ideal for storing a doll’s spare outfits or small toys.
- Staircases with Under-Stair Cupboards: If your dollhouse has a staircase, the space underneath is prime real estate. Build a small, cabinet-style door that swings open to reveal a hidden storage nook.
- Kitchen Cabinets with Deep Shelves: Ensure your kitchen cabinets are deep enough to hold miniature food items, dishes, and cleaning supplies out of sight.
Visible but stylish storage also has its place. A wall-mounted pegboard (made from a piece of cardboard with holes punched in it) can hold tiny tools, scissors, and ribbons with pegs made from toothpicks or brads. A rolling kitchen cart (a small box on casters, which you can find at craft stores) adds storage and mobility. Baskets and bins are essential; make them from folded and woven strips of paper, fabric, or even thin slices of plastic basket. Place them on shelves or under tables to corral loose items.
When designing storage, always measure your smallest item you need to store and build the compartment slightly larger. Consider using magnetic closures (tiny magnets glued inside) for seamless, hidden doors. These smart solutions not only keep your dollhouse orderly but also add interactive, realistic details that children and collectors will appreciate, proving that functional design can be beautiful.
Kid-Friendly Projects: Safe and Fun DIY for Young Crafters
Involving children in doll house furniture ideas easy enough for little hands is a wonderful way to foster creativity, fine motor skills, and a sense of accomplishment. The key is to select projects that prioritize safety and simplicity, using tools and materials appropriate for their age. Supervision is always recommended, especially with sharp tools, but many steps can be done by kids with guidance.
For preschoolers (ages 3-5), focus on no-tool activities:
- Decorating Pre-Made Bases: Provide simple cardboard boxes or wooden blocks (from a craft store) and let them decorate them with stickers, markers, or non-toxic paint.
- Fabric Swapping: Let them choose fabric scraps and help glue or double-sided tape them onto pre-made pillow forms or seat pads.
- Nature Crafts: Collect small twigs, leaves, and pebbles to create miniature furniture—a leaf can be a rug, a pebble a table.
For elementary schoolers (ages 6-10), introduce basic tools:
- Cardboard Cutting with Safety Scissors: Provide pre-drawn templates for simple shapes like a bed or chair. Let them carefully cut out the pieces.
- Gluing and Assembly: They can glue pre-cut pieces together. Use tacky glue, which is less messy and strong for cardboard.
- Simple Sewing: Teach a running stitch on felt to make tiny pillows or a fabric "quilt" for a bed. Use a blunt needle and pre-threaded thread.
- Painting: Let them paint base coats with sponge brushes to minimize drips.
Project ideas for kids:
- A Matchbox Bed: An empty matchbox is the perfect size for a doll bed. Kids can paint it, add a fabric mattress, and make a tiny blanket from a piece of fleece.
- Clothespin People and Furniture: A clothespin is a ready-made doll. Kids can draw a face and add fabric for clothes. Two clothespins glued together form a simple chair.
- Bottle Cap Stools: Paint a bottle cap, glue a small circle of felt on top for a cushion, and attach four matchstick or toothpick legs.
Always choose non-toxic, child-safe materials. The process should be joyful and frustration-free. Frame it as "helping the dolls have a home," and display their finished pieces proudly. These shared projects become cherished memories and teach valuable lessons in resourcefulness and design, perfectly aligning with the spirit of easy dollhouse furniture.
Budget-Friendly Sourcing: Where to Find Materials Without Breaking the Bank
Pursuing doll house furniture ideas easy on a budget requires knowing where to source materials inexpensively, often for free. The secret is to think beyond the craft store and embrace recycling, dollar stores, and thrift shops. With a little hunting, you can build a substantial material stash for a fraction of the cost of a single miniature furniture kit.
Free and Recycled Sources:
- Your Own Recycle Bin: As discussed, cardboard boxes, plastic containers, fabric scraps from old clothes, and ribbon from gifts are all free.
- Local Businesses: Ask at grocery stores, liquor stores, or cafes for sturdy boxes (like wine boxes or produce crates), which are often given away. Coffee shops may give away used coffee bags, which can be repurposed as rustic wall coverings or rug material.
- Community Groups: Check Facebook Marketplace, Freecycle, or community bulletin boards for "free craft supplies" or "moving boxes." People often give away unwanted craft kits, fabric, or small furniture that can be broken down for parts.
Dollar Store Treasures:
The dollar store is a paradise for miniature crafters. Look for:
- Miniature Wooden Items: Small picture frames, craft sticks, and wooden beads can become furniture frames, legs, or decorative accents.
- Fabric and Felt: Small craft packs of felt or fabric squares are perfect for upholstery and soft furnishings.
- Hardware: Tiny hinges, knobs, and hooks can add realistic detail to cabinets and doors.
- Miscellaneous: Buttons, beads, pipe cleaners, and modeling clay are all useful.
Thrift Stores and Flea Markets:
These are ideal for finding real miniature items to repurpose or inspiration. Look for:
- Broken Jewelry: Beads and charms become perfect miniature decor.
- Old Sewing Supplies: Thimbles, spools, and tape measures are instantly recognizable miniature objects.
- Small Wooden Toys or Games: A broken game piece can be a chair, and a tiny wooden train can be repurposed as a shelf unit.
- Fabric: Large scarves or linen napkins provide vast amounts of material for curtains, bedding, and rugs at a low cost.
The strategy is to build a "material library." Organize your collected items by type (woods, fabrics, metals, plastics). When a project idea strikes, you can shop your own stash first. This approach not only saves money but also encourages creativity, as you solve design challenges with the materials on hand. It’s the ultimate way to practice easy dollhouse furniture crafting sustainably and affordably.
Conclusion: Your Miniature Masterpiece Awaits
Creating a captivating dollhouse world is not about expensive purchases or advanced skills; it’s about vision, resourcefulness, and the joy of making. The doll house furniture ideas easy we’ve explored—from repurposing bottle caps and mastering cardboard construction to applying simple paint finishes and designing themed rooms—demonstrate that anyone can be a miniature interior designer. Each project, no matter how small, adds a layer of personality and story to your creation.
Remember, the most charming dollhouses often have a mix of store-bought and handmade items, with imperfections that whisper of love and labor. Start with one simple project, like a padded matchbox bed or a cork ottoman. As your confidence grows, tackle larger pieces and experiment with combining techniques. The statistics are clear: the global miniatures and dollhouse market continues to grow, fueled by adults seeking mindful, creative hobbies—proof that this timeless craft resonates deeply.
So, gather your cardboard, your fabric scraps, and your curiosity. Transform that empty shell into a vibrant home where every chair, every cushion, and every painted wall tells a story. Your easy, beautiful, and deeply personal dollhouse furniture journey begins with a single cut, a drop of glue, and a dash of imagination. Now, go build your miniature world.